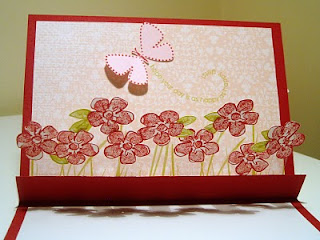
This card has a lovely surprise on the inside...............
.....row of flowers to brighten your day!
The flowers are attached using strips of acetate, so they appear to magically bloom in the foreground. I cannot remember where I saw this out there on the web, but here is my version.
Cardstock: Riding Hood Red, Kiwi Kiss, Whisper White
Ink: Riding Hood Red, Kiwi Kiss
Stamps: Wonderful Favourites, Flower Fancy, Flight of the butterfly, Inspired by nature
Acc: Bella Rose DSP, acetate, mini glue dots
Stamp one large and several small flowers with the 2-step stamps from the Flower Fancy set. Since the outline and the "watercolouring" can be done in 2 easy steps using just the ink pad, this is a very efficient way of achieving a coloured in image. To achieve a softer result for the flower colouring, I inked up the stamp then stamped it off on to scrap papre first, then stamped it over the outline stamp. Carefully cut out the flowers and set aside for later. Make some leaves in the same way. Assemble the card front by positioning the large flower and leaves as you like, and stamp a sentiment on the front. Inside the card I adhered a folded strip of matching riding hood red cardstock to the inside top along the fold line to create a flap for the acetate and flowers to be adhered to (see pictures above) and then a piece of Bella Rose DSP also to the inside top, after stamping it with the grass stamp from Inspired by Nature and a butterfly and sentiment from the Flight of the Butterfly set. This created a nice background for the blooming flowers. Cut thin strips of acetate approx 8mm wide and then trim them down to different lengths for your flower garden. Using mini glue dots makes adhering the flowers and acetate a breeze and is a very neat finish. You can use double sided tape, more patience is required, so don't attempt this when you are tired or the kids are wanting to "help"!


No comments:
Post a Comment